When I saw the first pics of Bandai's 1:2 BB-8, I thought it might be a joke. Quickly realising it wasn't, the proverbial reaction followed -

A week or two later I found a reasonably cheap offer for the kit on eBay from Japan, and just seven days later the huge box is in my hands.

The first thing you notice is the box is an "up scaled" version of the smaller boxes kits like the X-Wings and TIEs come in - just four times the size.
Inside it's a familar story, massive parts on sprues, a big instruction booklet and for this model, one LED kit to install in BB-8's main eye piece.

Thumbing through the instructions, it's clear the head unit has space for TWO more optional LED kits which appear to be the same ones the Millenium Falcon kit takes.

These are really expensive for what they are, and the idea of a) paying for two and b) having three sets of batteries is ridiculous. This will be a simple electronics job to wire up something for much less cost.
Working through the kit parts for the body, it occurs Bandai have missed a trick on lighting for the main body - all the various parts of BB-8's main body have correctly colored transparent pieces to assemble, but there's no design in the molds to accomodate housings for wires/LEDs.
Still, the size of this kit means it is very easy to modify and the hollow center has plenty of space to accomodate electronics.
Build wise, it's very similar to the smaller BB-8 kit Bandai shipped with R2 around The Force Awakens release, though clearly with more detail and more fidelity to parts that would have been two small in the minature version.
The body is built with six of the orange circular discs you'll be familiar with, and two of these have "interactive" features which is a nice touch.
The first is a simply flap that opens a hatch where you can place one of three optional tools BB-8 deploys - the electrocution zapper, clippers and the infamous "lighter"
The second disc contains an ingenious design where one of the silver flaps can be easily pryed open (there's a recess for your finger) and upon pushing it down, it anchors up the small draw BB-8 stores the map to Luke Skywalker in.
The smaller BB-8 kit featured a glossy coating on the white parts of the kit, where the silver and orange parts were inconsistant with Bandai's normal plastic. For the 1:2 build, the white parts are normal plastic without the gloss finish which is great.
The only non standard thing on the sprues are the antenna designed to slot in BB-8's head, which are injected with a more rubbery plastic to accomodate some bending - a welcome touch.
Starting the Build

Given this is a fairly simply build, there are only three colors to deal with bar details.
That said, the size of this thing made me loath to airbrush it so I bought a couple of rattle cans to get it done quicker.
For the white parts, I bought a Tamiya white primer and coated those with it - no other paint.
For the silver parts, I primed those with a Tamiya fine grey primer from a rattle can and then airbrushed on a Vallejo's Chrome on top.

For the orange, I primed these with the Tamiya grey, and then air brushed a Mr. Hobby Orange that was very close to the reference pictures I have of BB-8.
This was a mistake - applying Orange over the top of the grey created a greenish tint to the paint which required a couple of coats to cover out. Luckily the size of this thing can acommodate a few coats without any issue.
Since I knew a couple of coats would be needed, I took the opportunity to add some paint modulation around these ring sections. I sprayed Tamiya yellow in the centre parts, then carefully shaded the edges with a Vallejo red/orange.
One more coat of the Mr. Hobby Orange on top of this created a result I'm really happy with.

It's tempting to grab this kit and assemble it without any painting whatsoever because it looks so good, but it benefits so much more from painting.

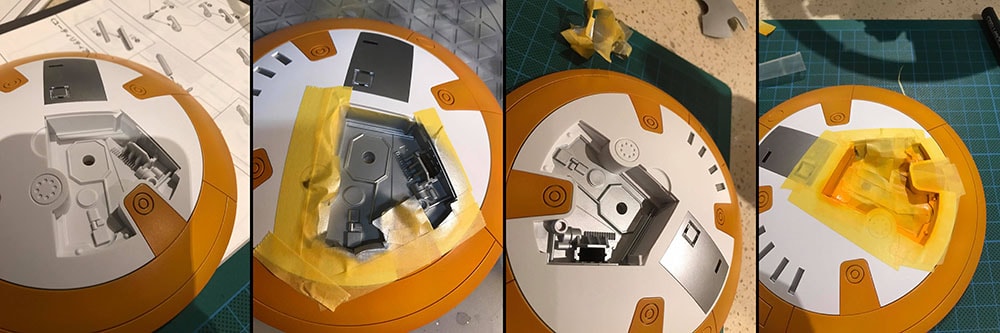
The last job is painting the detailed elements such as the accessories, panel recess and draw, all of which are more challenging the rest of the build because the pieces require masking to get right.
Case in point, the flap recess in one of the white panels has grey/orange details on the reference photos which I decided to take on. This required two rounds of laborious masking - first to lay from the metallic background; then once dry, another round of masking to seal both the new metallic background and white areas to paint an orange rim inside the recess. An absolute ballache, not made easier by needing to remask a third time to correct issues with the orange coat.
Paint Finished
With the main pieces painted, I glued the discs and parts of the head ready for clear coating.
For this, I applied 2 or 3 three coats of Tamiya gloss to seal the paint before weathering.

One of the great things about this kit is there are two "spare" white sections that sit between the rings - they're not really spare, since you'll need them depending on what configuration you want to mount BB-8 in to expose the draw or parts panel I mentioned earlier - these require differenct configurations of the panels to show each combination.

But knowing there would be a spares, I had a big piece to test weathering patterns on.

I bought the "Visual Dictionary" for The Force Awakens when the film came out, which has a great double paged picture of BB-8 where you can see his weathering in detail. This was a good reference to test out a couple of techniques.
In the end, I settled for applying Abteilung's Dark Rust Oil paint with a sponge to create the weathered texture you see around BB-8's rings, and parts of his head and body. Progressively fading this in with clean sections of sponge then applying more created what I think is a convincing effect.

Just with this weathering, it looks breathtaking - like the real thing is sitting on my desk.
With the oil paint applied, I need to leave it a week for the oil paint to fully dry, then I'll decide what else needs to be applied. I still have some detail work to do around the draw section and the head electronics, but even without those complete this thing looks phenomenal.
It's not a cheap kit, but it's easily the most fun one because it's so easy to put together - it's just easy to handle the bigger parts compared to the smaller kits.


Reference Photos
Here are some reference photos I found that I used along with the book which may help your build