One of the problems with close-up or macro photography is the narrow depth of field created by your camera.
When you're taking a portrait, it's great to have a narrow depth of field to isolate your subject and make the background (and foreground) soft and defocussed.
For Toy Photography, this effect is great in some scenarios as well, but for the most part, we want our subjects sharp and in focus.
Mastering Macro
With macro, capturing the detail on an insect or flower is a challenge when working with this constraint.
You can use a telephoto and zoom in, but you lose out on the sharpness that typically available with faster prime and macro lenses (unless you're swimming in money).
You can dial your aperture all the way up to increase your depth of field and use a longer shutter speed (I'll typically shoot f11-18 on a 50mm lens), but that means you'll need a sturdy tripod to compensate for the exposure time.
With toys, you don't have the problem of your subjects moving (usually) so longer shutter speeds are less of an issue. Keep your ISO all the way down at 100 or 200 for a nice clean image.
Even with this setup in place, you won't eliminate shallow depth of field completely.
If you want a super sharp picture all the way through your scene, a newer technique has become available thanks to the wonders of modern technology (specifically Photoshop).
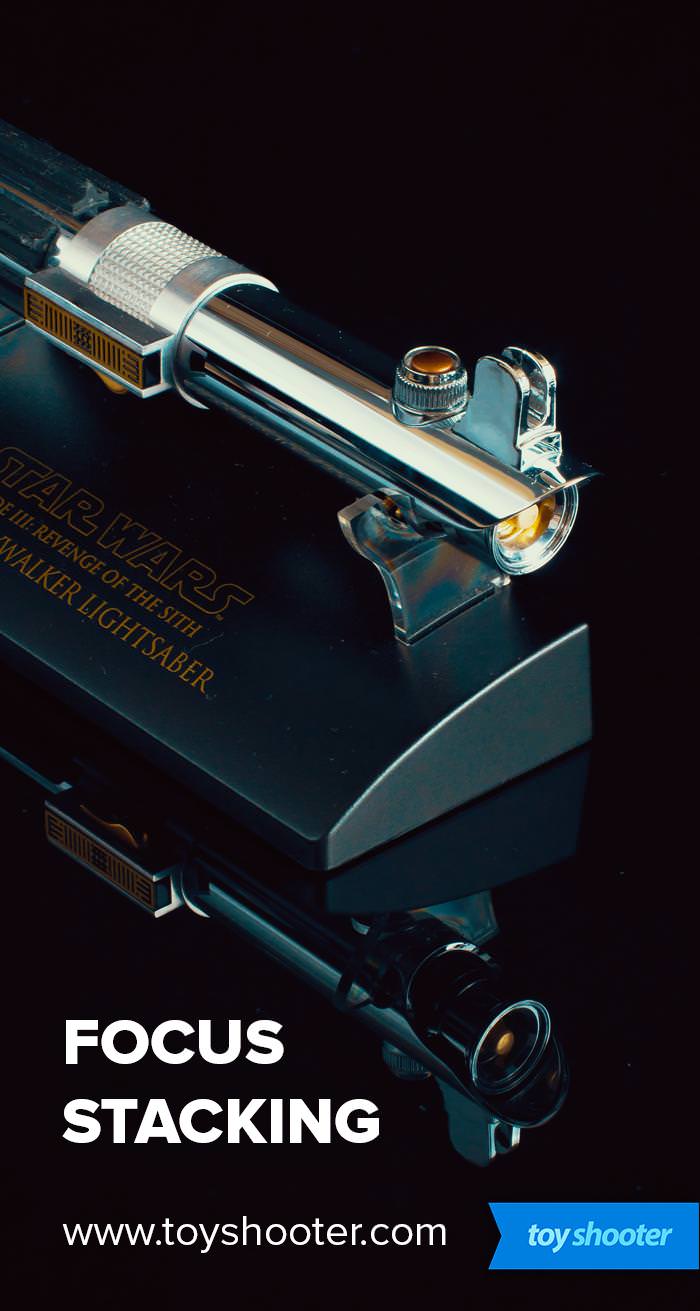
Focus Stacking
In a nutshell, focus stacking involves taking multiple shots of your subject at different points of focus, then using Photoshop to combine these shots, eliminating the out-of-focus area and leaving you with a super-sharp result.
If this sounds scary complicated, don't worry - it's actually pretty easy and you can nail it on your first try. You do however need a few things -
- Manual focus
Your camera must have a manual focus ring. If you're not shooting on a DSLR this may not be available in which case there's no way you can reliably do this. You'll also benefit from a larger lens where the focus ring will respond to smaller adjustments - not critical, but helpful.
- A sturdy tripod
This is a must. Your camera must stay in the same position between takes, and you'll be adjusting the focus ring on your lens so you need to know your tripod will keep your gear glued to the floor.
- Photoshop or similar
I'm sure there's other software that does a similar job, but Photoshop makes it dead easy so I'll be showing you the technique in that.
Step 1: The shoot
Prepare your shoot as normal, if you're not used to putting your camera on sticks take some time to get used to it and settle on a position you can frame your subject with.
Choose your priority mode (aperture, shutter or manual - DON'T use automatic) and dial in your exposure. At this point, you should be able to produce a final shot you're happy with (albeit with a shallow depth of field)
Now pull your focus ring back and forward and get an idea of what range you'll need to cover to see the entire subject in focus.
Figure out a starting point for the first photo of your focus stack. Make sure you're happy with the camera position and take the shot. Use a remote shutter release or wireless camera app if possibile to avoid touching the camera.
Now carefully move the focus ring a little for the second shot.
How much should you move it? This is hard to provide a recommendation on since your aperture, focal length and other factors will affect how much of your subject is in focus; and thus the minimum amount you can move your focus through the subject to capture all parts of it in sharp focus.
To start with, go by the notches on your focus ring - this is a small movement and will give you a nice set of equally spaced shots for Photoshop to work on.
Use the lightest touch when you handle the focus ring. You'll see that even touching the lens moves the picture on your camera monitor, however your sturdy tripod should bring the shot back into the starting position for each shot. Photoshop will be able to compensate for minor movement errors later.
At this point, you simply need to repeat this process until you cover the full depth of your subject. You only need to cover your subject - if you want to leave things in front / behind the subject out of focus, simply stop taking shots when you want.
Unless your subject is very deep, I doubt you'd ever need more than 20 shots for a focus stack. Most of my focus stacks are usually 6 - 10 shots.
Only other thing to say here is make sure your shooting enviroment remains consistant during the shoot - don't open doors, windows or move anything that could change how your subject/scene are lit. Every photo in your sequence should be identical except for focal point.
Step 2: Lightroom Prep (optional)
If you use Lightroom, get your shots imported and pick one photo to treat - I always pick the first one in the series. Operate on it as if it were a single photo - dial in any exposure adjustments, saturation, vignettes etc until you're happy. Don't apply spot treatments (brush corrections etc) in Lightroom - you'll want to hold off until the focus stack operation is complete.
Now right-click on the thumbnail of the photo you've treated and select Settings - Copy Settings.
Now select the thumbnails of all the other shots in the sequence, right click the selection and select Settings > Paste Settings. This will duplicate all the treatment you gave to the first photo on the others in the sequence.
You can now select all the photos and export for Photoshop
Step 3: Focus Stack!
Open Photoshop and select File > Scripts > Load Files Into Stack.
Click browse and locate the photos in your sequence. MAKE SURE you don't select any test shots or photos that aren't part of your sequence.
Before you click OK, check "Attempt to Automatically Align Source Images" which will compensate for any minor camera movement errors
The import process will take a little time, sit back until Photoshop loads all of your shots onto separate layers.
Each of your photos is now loaded onto a separate layer, one on top of the other.
Now select all the layers and click Edit > Auto Blend Layers. Make sure you select "Stack Images" and check "Seamless Tones and Colors"
Click OK, and wait for Photoshop to do it's magic.
That's it!
If your photos were successful, you'll get a super-sharp image now comprised of different sections of each of the layers Photoshop has worked out is the most "in focus" in each case.
Unless you can see any flaws when you zoom in, merge these layers and save your focus stack.
You won't always nail this. One shot with an error will through the whole process out of whack, so patience is necessary. That said, my failure rate is very low.
Now you're in Photoshop, you can apply any treatments you skipped in Lightroom, such as dodging and burning.
Enjoy!