For as long as I have been practicing toy photography and photoshop compositing, the work myself and many others have done has always seemed like an imitation, almost a homage to artists "higher up the food chain"
Concept artists, character designers, illustrators, painters and 3D modellers produce work we ultimately copy within the toy photographer/photoshop medium. Sometimes it feels like producing toy photography in place of the ability to illustrate or 3D model the "real thing" is a cheat.
For the first time (for me at least), this work feels like I have crossed a threshold -
Download desktop wallpaper - 1920 x 1080
- 9778 x 5500 pixel final render size
- 185 layers
- 10.1 Gb of combined linked Photoshop files
This work is a fusion of Photography, 3D Modelling, Art Theory and Photoshop.
As you'll find out below, each has been indispensible to produce this.
This is my best work to date, and the longest to produce - probably 40-50 hours went into this. I learnt a lot creating this, whilst bringing to the table 25 years of Photoshop experience to take on the challenge.
I tried some new techniques for this which I thought would help elevate my work, they paid off and took things to a level I couldn't have imagined.
Contents
Preparation
The Wait
First - a funny reflection. I looked back at this post I wrote 3 years ago (!) where I mentioned playing a "very very long game as a collector / photographer." That was in reaction to the length of time it took me to acquire the Hot Toys Star Wars New Hope figures.
By comparison, the wait for Hot Toys Avengers Endgame figures has been an eternity.
Hot Toys announced the full character slate not long after the film's release, but it's been a stretch getting these in hand. COVID threw an obvious hand grenade in things, then issues with the battle damaged Iron Man production extended the wait for him even further. Just to add insult to injury, the Australian government changed battery law regulations which basically prohibits the import of at least one type of battery Hot Toys use in their figs, which caused further chaos for local retailers. I'm just happy I finally got Iron Man - albeit with no batteries.
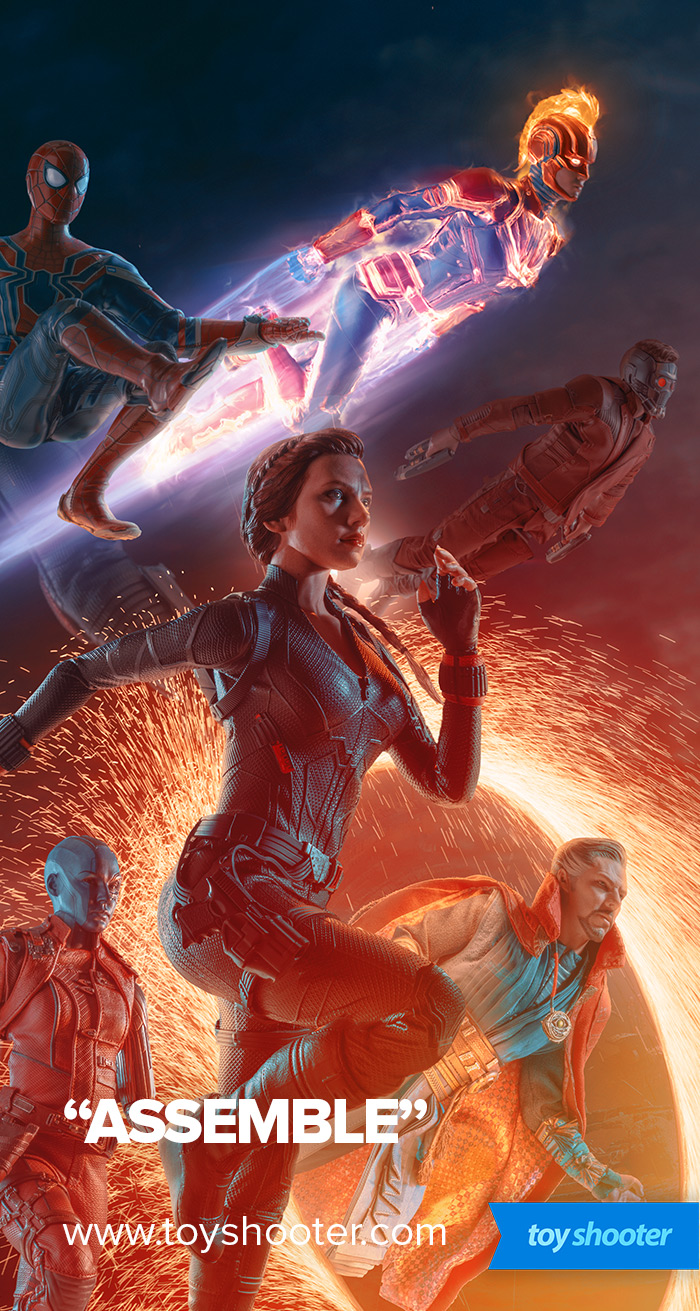
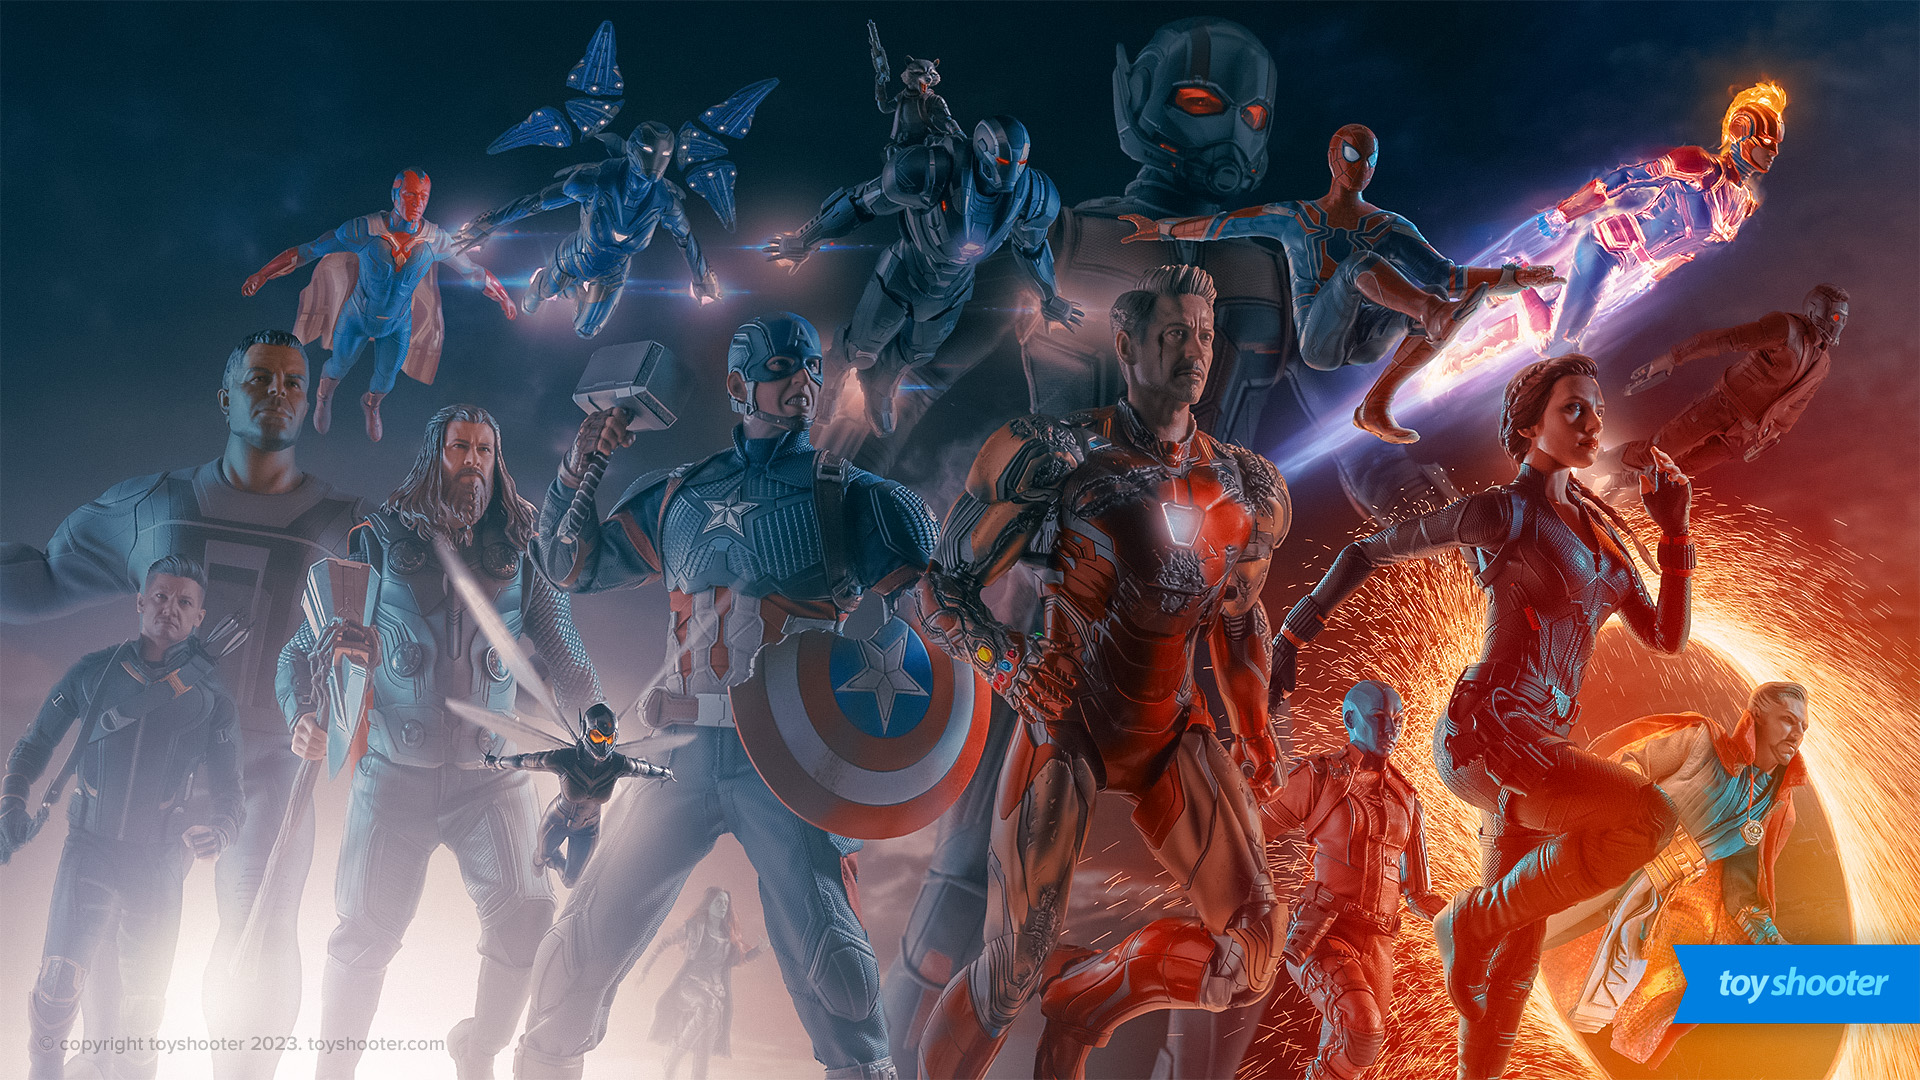
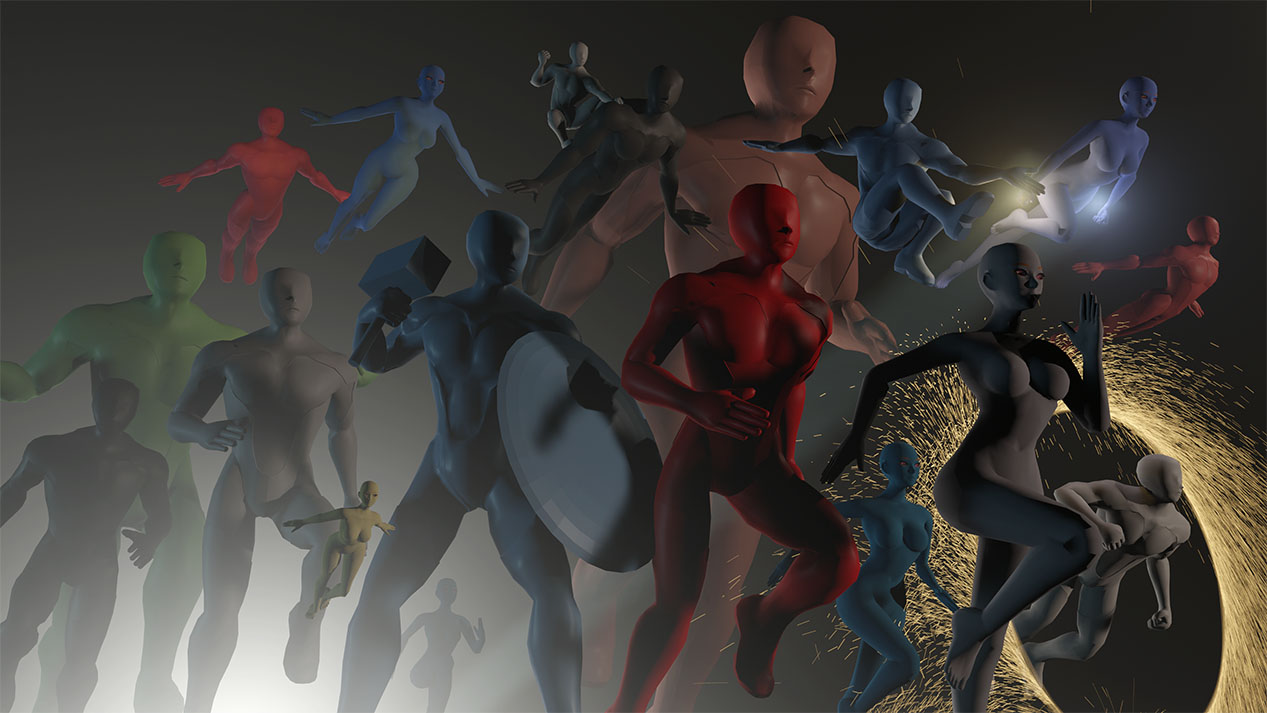
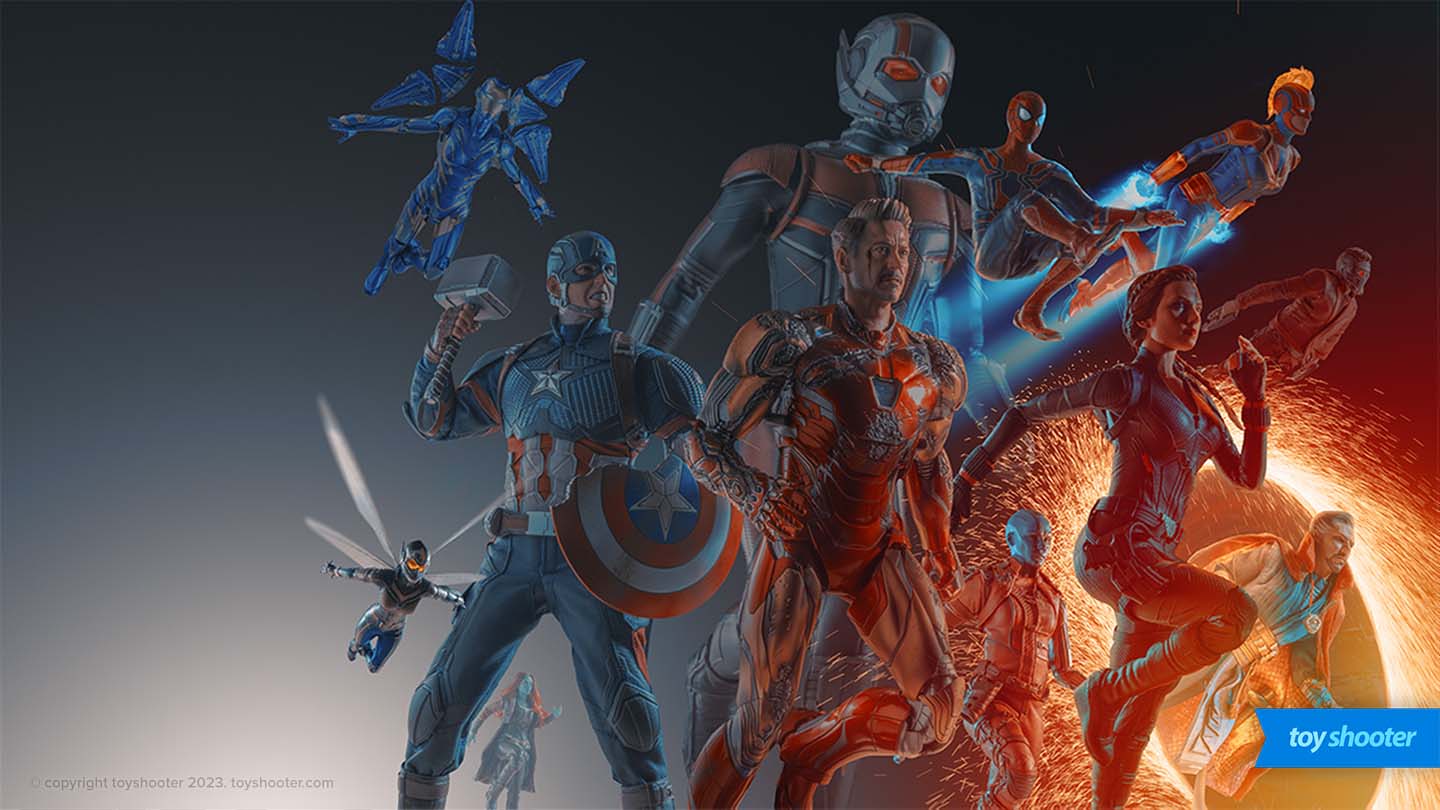
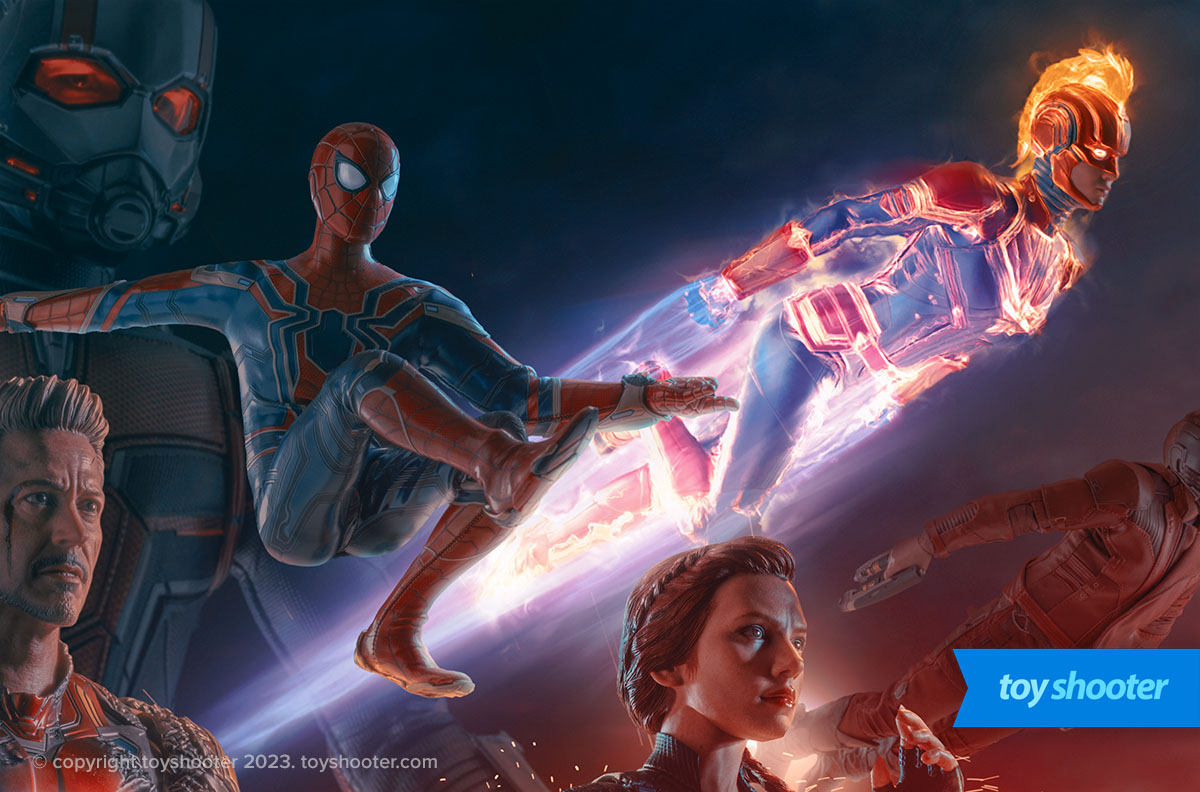
Avengers Assemble
This work is based off the Avengers I've chosen to collect and have in hand. In some cases I made deliberate purchases just for this work. That said, none of these figures have disappointed in hand. I've never owned any of Hot Toys' die cast pieces so Iron Man, War Machine and Rescue are a real delight to experience.
I tactically sought out Star Lord, Gamora, Strange, Spidey, Wasp and Ant Man during the 3 year (!) wait as key supporting cast. Black Panther I long missed out on however I am tempted by the recently announced re-release. Shuri & Drax are too pricey second hand now. Bummed I don't have Drax - Guardians 3 will hopefully fix that.
Whilst this piece leans heavily on Endgame, it's very much my "fantasy" version character wise.
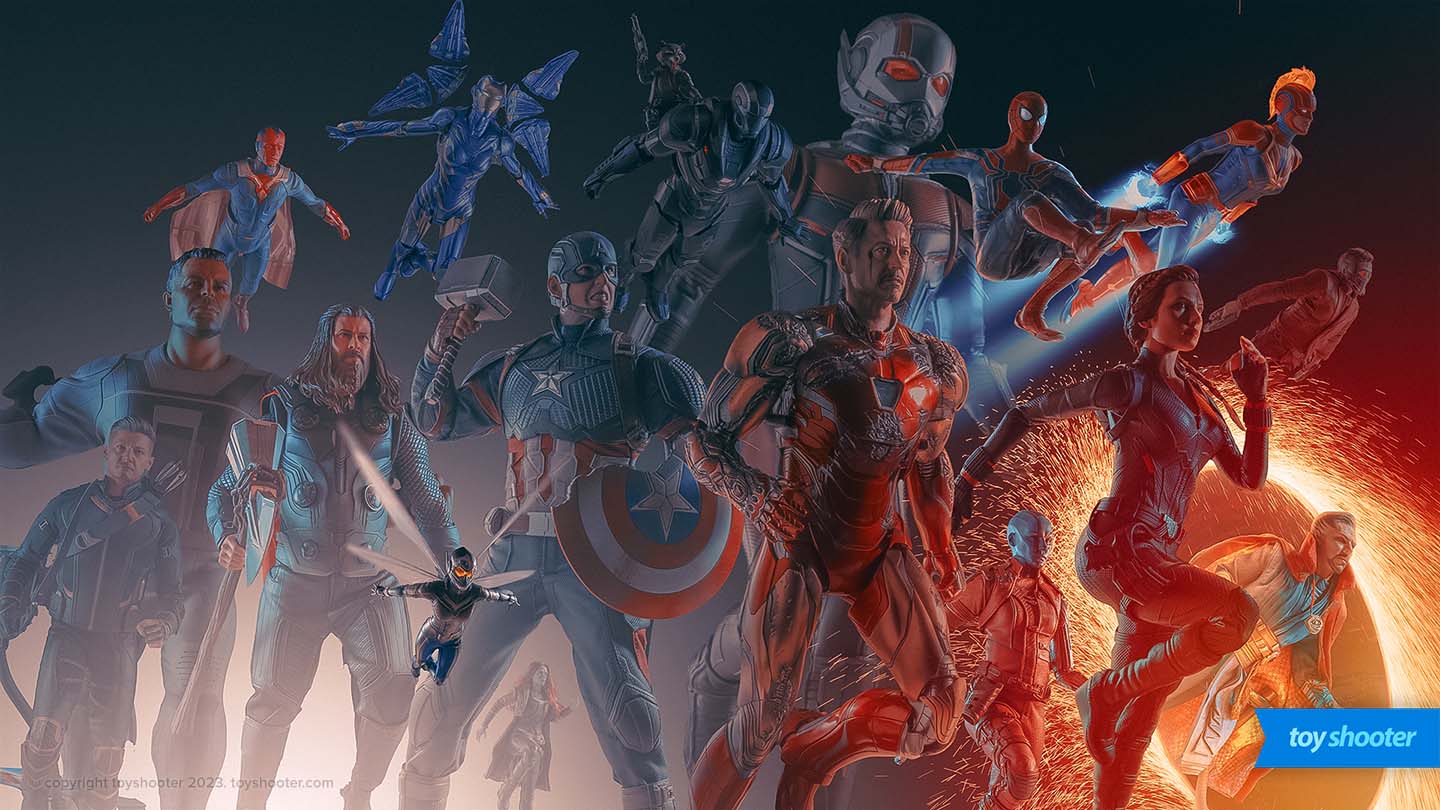
First order of business, I've retconned Natasha's unforgiveable fridging and brought Black Widow back to the action.
Next - I wasn't a fan of the Iron Patriot armor, or the price tag on the figure; so I stumped up for Rhodey's War Machine armor. Similarly, I wasn't fussed by Captain Marvel's Endgame suit, so stuck with the far superior solo movie version.
Like Black Widow, Vision is a key part of the Avengers to me so he's also back from the dead. There's one more key character missing from this - more on her later.
So at last, 18 characters in hand. How the hell do I include all these in one piece?
Planning
I collect art all the time, regularly mining Pinterest for inspiration for pieces like this. In this case, I'd shortlisted various interesting works -
There's various different styles there - it's less about looking at individual characters and more about looking at the overall layout of a group of characters - substitutes can be made.
Even with these great ideas, I know from experience the more characters you include in Photoshop composites, the harder it gets. It's especially hard with photography since you're locked into poses / lighting from the get go - if you can't make character arrangements work, you have to reshoot.
Hot Toys piece aren't like a $25 Marvel Legends figure either - they need a little care thus take longer to shoot.
How to prevent this becoming a nightmare?
Enter Blender.
Pre-Visualization
I recorded a video 2 years back on using Blender for pre-visualization, so safe to say I knew its power for working in the two dimensional space.
By mocking basic characters and environments up in Blender first, you can dial in their relative positions and luminosity perfectly, then reference your pre-viz renders in Photoshop to build out your piece.
With the Hoth piece shown in that old video, I was dealing with a legion of non-descript Snow-troopers scattered mostly in the distance. The Avengers are a completely different ballgame - each competing for screen real estate, each having their own powers - a simple mock up wasn't going to cut it.
Rigging
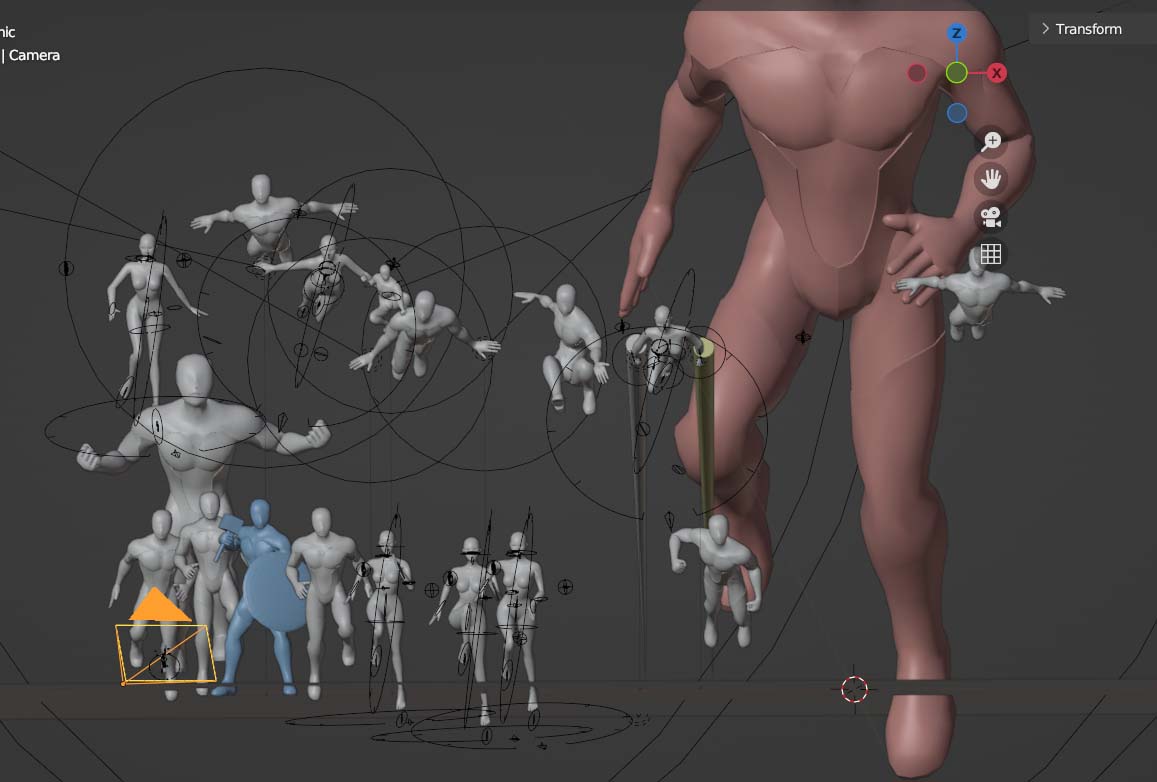
What I really wanted to do was find a pre-rigged human body I could easily manipulate within Blender to pose each of the characters in close to final poses directly in Blender. I could then move things around in the 3D space, compose through Blender's camera and experiment with lighting before touching my Sony A7SIII.
Six of the Avengers are air born, and three have "scaling" possibilities that are also possible to replicate in a 3D space before I consider dangling Spiderman on some fishing line.
After a lot of Googling, I found the work of RoyalSkies who has pre-rigged male and female bodies. These are anatomically on-point for super hero body types, and really flexible.
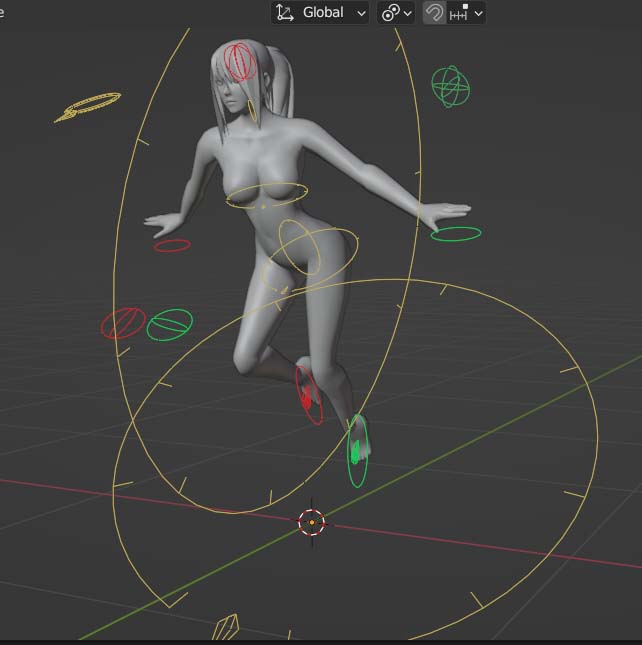
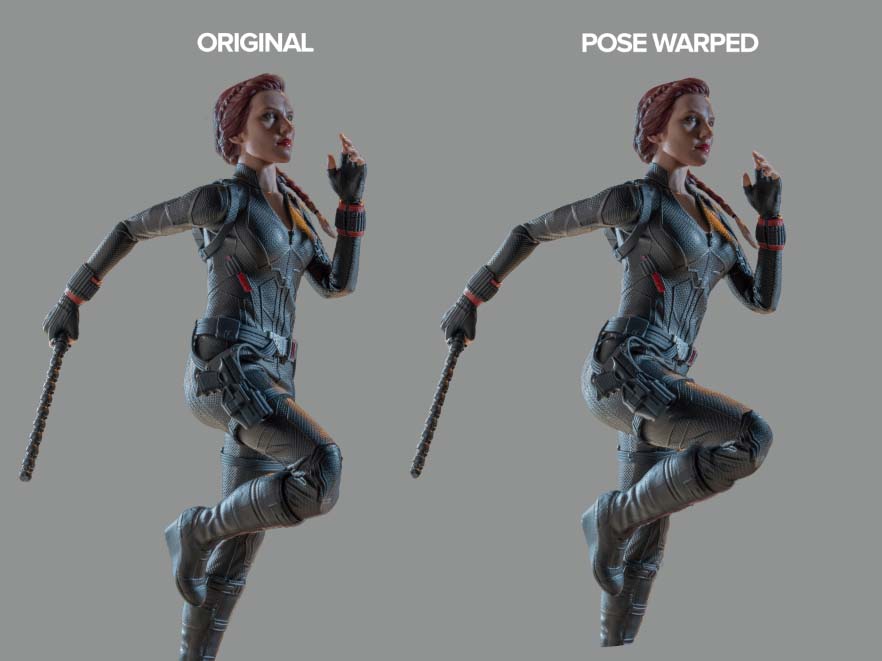
I started by creating pose variation for both the male and female body types. In both cases, I referenced poses from films, art and comics to lock in "superhero" poses. In the case of Black Widow, I copied a reference pic accurately.
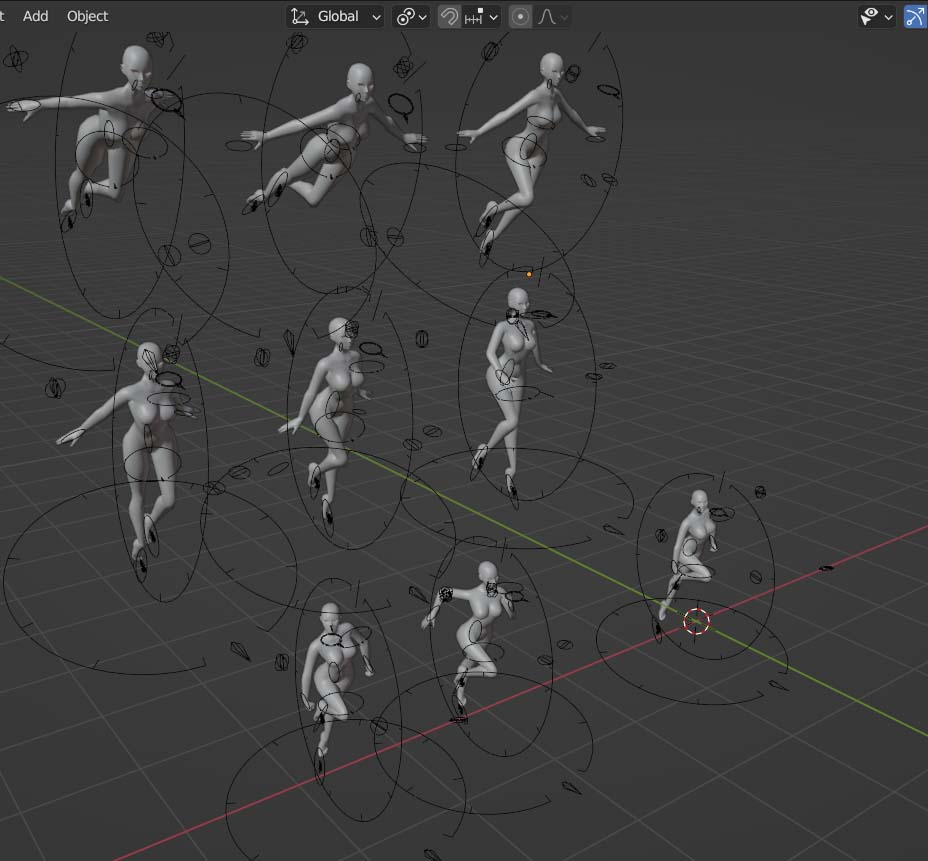
With a "pose library" to choose from, it's time to start arranging.
Here it's a case of add a pose, move it around and juggle the pieces until is makes sense:
I added color shading to some of the models to roughly resemble the assigned characters - red for Iron Man, Green for Hulk etcetera.
You'll notice the 3D model spaces some of the characters out - that's deliberate, it's in service of the camera lens, not what the characters are "working towards" in the scene.
You'll also notice there's a mysterious 19th character lurking on the top left. This is a space reserved in the final piece for one Scarlett Witch once Hot Toys release the WandaVision version of her.
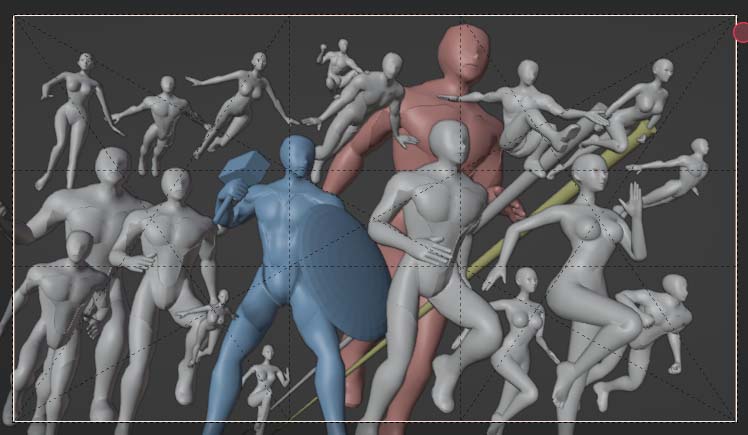
What the 3D Camera sees
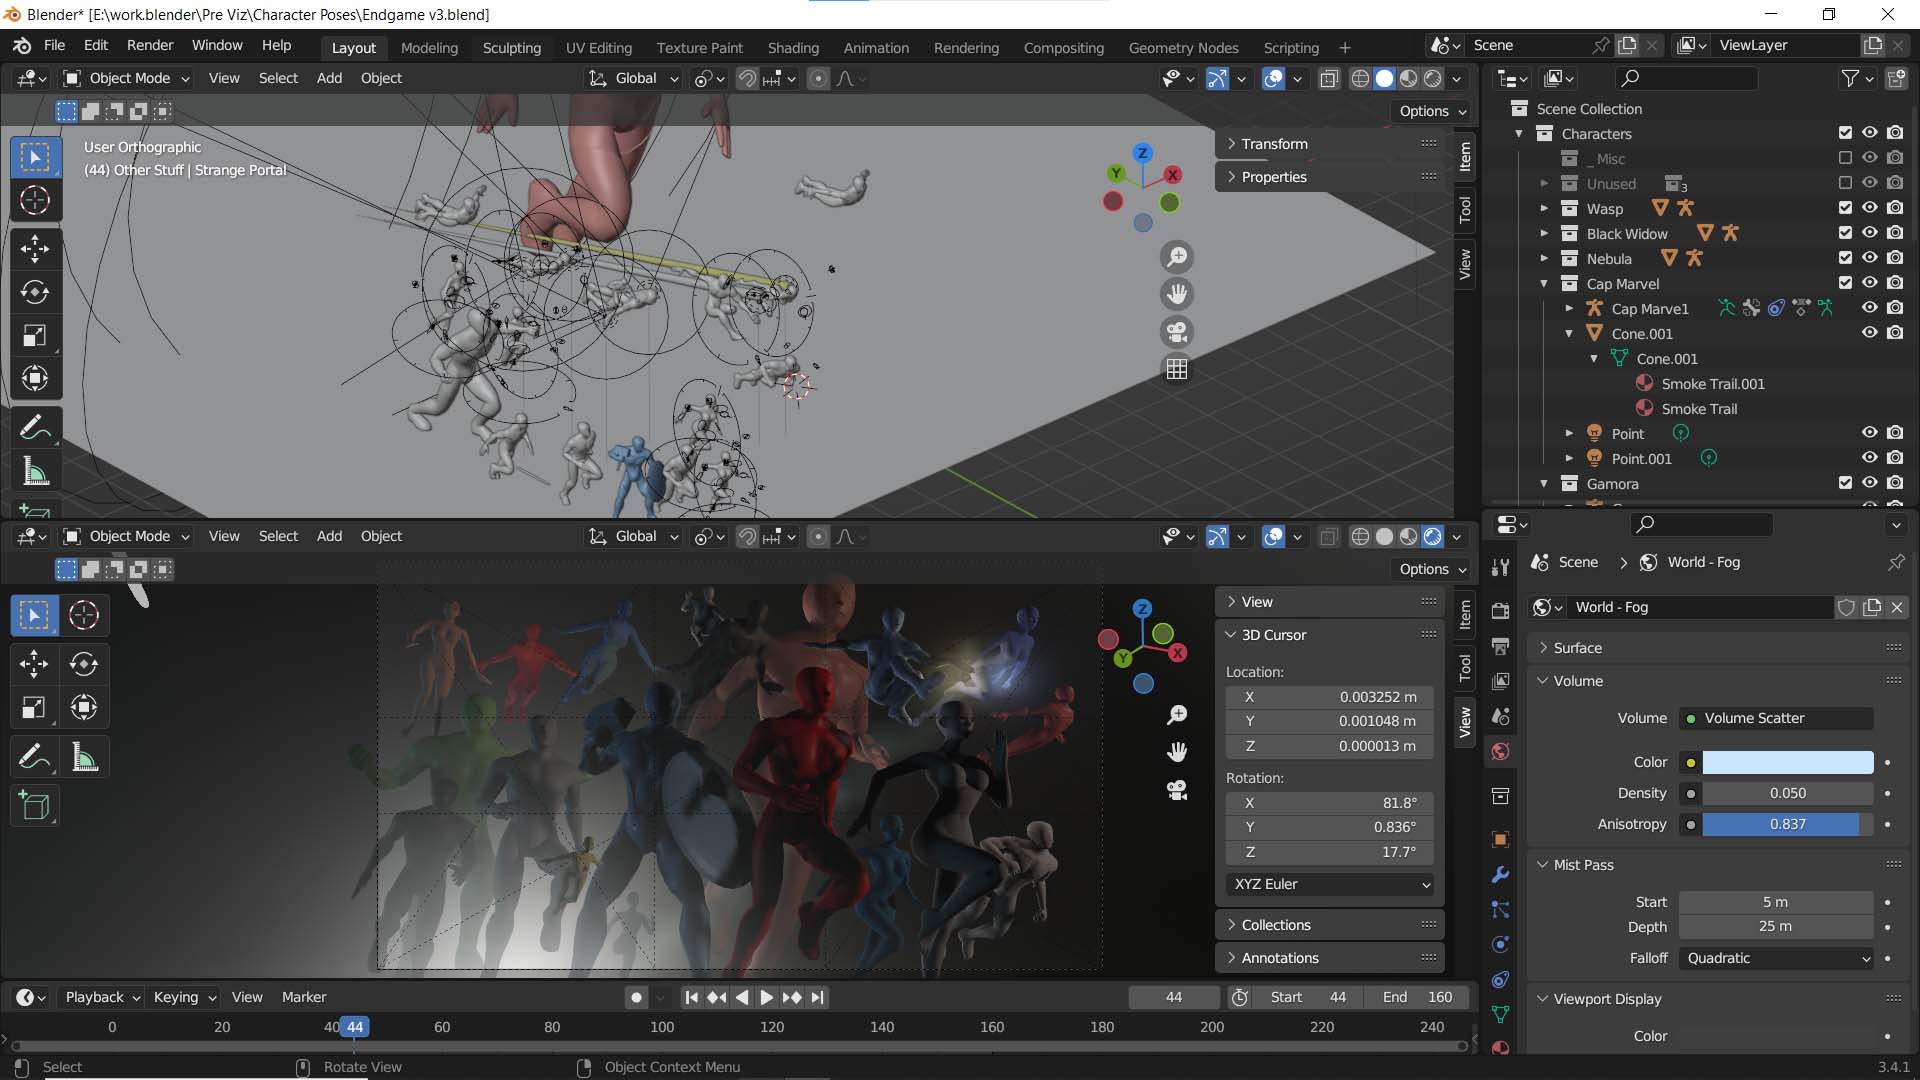
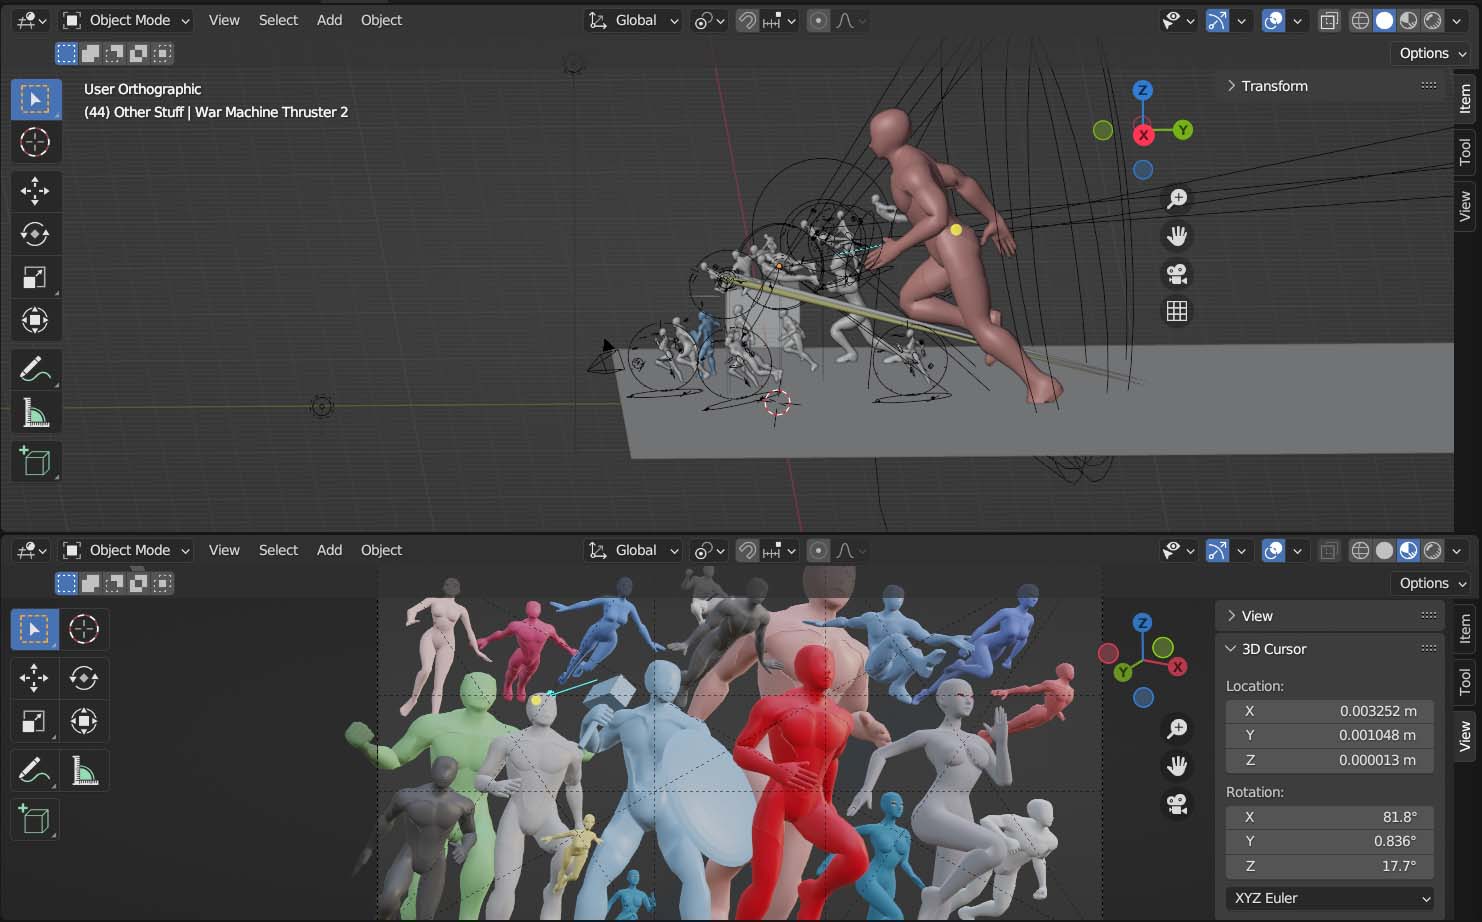
Key thing for me with Blender is to work in a split view so I can see what the final render will look like in one half of the screen and have the other half to move/pan around in and make adjustments to the model.
Camera setup is really important in Blender - you can model things to the centimetre in Blender and the camera will obey all the rules of physics, just like a real one.
I used a 31mm "lens" for the composition which is wide - this is one of fundamental creative choices affecting this piece. Look at the eye line of the main characters across the final piece up above - Hawkeye is almost looking at you, by the time you pan across to Widow/Strange they're looking out the right of frame. Funny thing? All these characters are facing the same direction in Blender -
This is the effect of a wide angle lens - it will "bend" light / space. Try doing this in Photoshop without a reference! I'm sure skilled artists could, but this is one of the powers of Blender - you can dial this stuff in without guess work.
Next thing - check out those camera settings in Blender - it supports projecting dynamic symmetry armatures!
Those compositional guidelines help you compose your scene, in my case using these guidelines to "lock" characters to lines and spaces. I do this two dimensionally in Photoshop all the time, here I'm just working with the 3 dimensional controls on each character to move/rotate characters where I want them.
Last observation about the camera - I forgot Blender's default aspect ratio was 16:9! - 99% of my work is 4:3 which suits print and Instagram cropping, but this is a happy accident. I can't imagine a scenario where this would have worked in a 4:3 aspect ratio.
Lighting
Blender's other core benefit for pre-viz is simulating lighting across the scene. You can produce any lighting setup you like with the most basic lighting tools in Blender without even getting into special effects.
Here's a top down view of the lighting setup I placed around the scene:
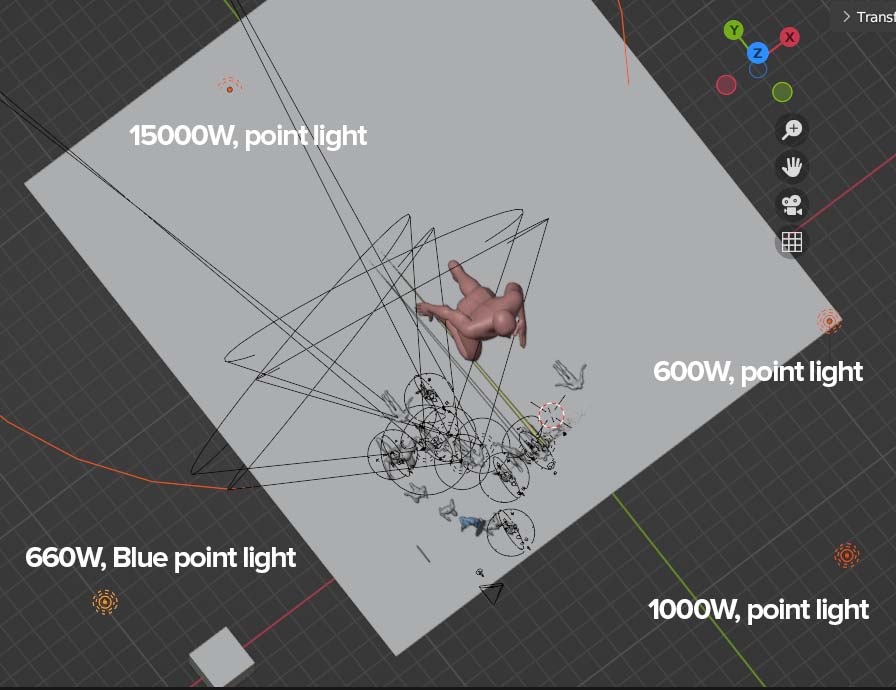
What should be obvious is this is highly keyed from the background light, simulating a sunrise/sunset kind of effect on the left. The other lights (side / front) are simply to put some definition on the characters throughout the scene.
Where Blender really shines is simulating atmospheric perspective, as I covered in that video linked at the top of this article.
This is just standard volumetrics applied to the scene to create haze throughout, here's out it looks zoomed out:
FX
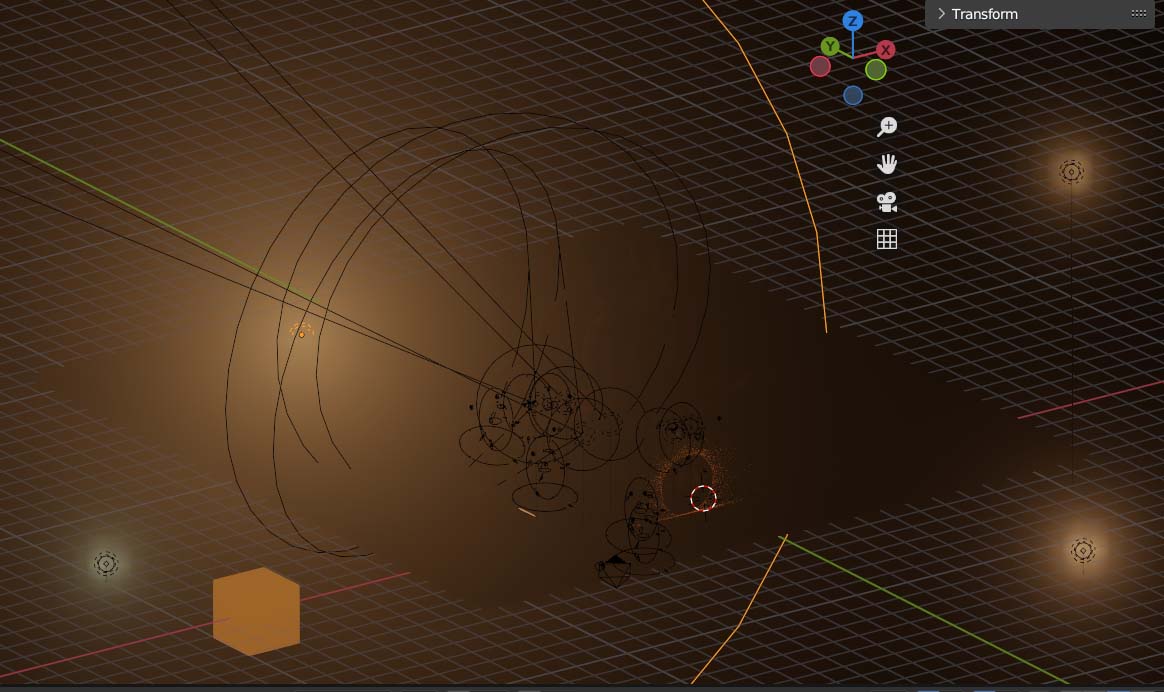
Dr Strange's portal is a re-production of Default Cube's excellent tutorial on Youtube. I created the portal directly in my scene to see it's effects on lighting and other characters:
The portal is really a character, so it's placement in the scene is just as critical as anything else. Note the angle of where it ends up is another effect of having Blender show accurately how it would look through a 30mm lens. It looks odd in isolation but it's 100% accurate.
With the pre-visualisation complete, I isolated the portal and rendered it out independantly of the scene to use directly in the Photoshop piece. It was effectively the first character shot.
Additional work in Blender included a simulation of Captain Marvel's "light trails" which is pretty poor to be honest - I wasn't too worried about doing anything special in Blender for this, just enough to get an idea of where they would be for creating the effect in Photoshop.
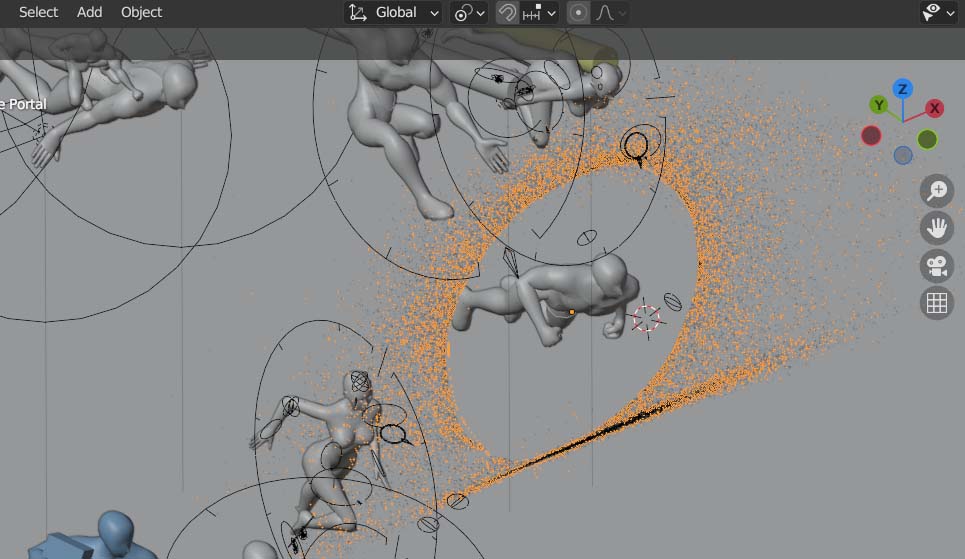
More important were the thrusters coming from Rescue & War Machine. Both models have lights placed on their hands/feet to simulate the glow their thrusters would produce on characters behind them.
Looking at the final pre-viz rendering, you can see why this is important - Vision's torso / face is lit up by Rescue's thruster.
Environment
One last thing I used Blender for was the world environment. I downloaded an HDRI shot from polyhaven and projected this to render a camera accurate view of the sky. Hiding everything except the sky, I rendered this out hi-res to use as the backdrop in Photoshop. As it was, I heavily darkened the shot to match the luminosity of the pre-viz background (above) to the backdrop is more a subtle texture than anything else, but it serves it's purpose - I don't want a busy background distracting from an already busy scene.
Character Poses
Finally I rendered out each character in isolation to have a reference for their pose and lighting for Photography.
Photography
As I've documented before, photography is straight forward for compositing. I don't do anything special with backdrops or colored lights - all of which can be faked in Photoshop easily should I want it.
Motivated lighting
One thing I did have with the pre-viz was reference to the 3D model's lighting positions - so rather than just "I need a rim light here" I knew what angle every light in the pre-viz was originating from, and could match it. I didn't follow this slavishly for every shot, but certainly worked close to it.
In addition, what Blender also shows is the affect of light from one character to another so the "Strange Portal" and Captain Marvel's jet trails have an effect on surrounding characters which I can replicate in isolation on the individual pieces - this was done very, very deliberately.
Once again, look at the thruster coming from Rescue's right hand in the final piece - notice Vision's upper body is lit by it - entirely planned from the pre-viz.
Many of the Hot Toys pieces have their own light effects which I used to full effect, Wasp/Ant Man's eye piece lights being highlights here. Captain Marvel's head piece lights were also helpful as a basis for the subsequent FX treatment.
Settings
All shots were F22 in Aperture Priority (Av) mode. I focus stacked any character not shot flat on (e.g. Rescue / War Machine) which makes Av a little lazy since different shutter speeds invariably creep in. Lightroom's "Match Total Exposures" feature takes care of this so I don't stress. Shooting was very rapid.
I re-shot Rescue who looked a bit flat in the first iteration, and re-shot Spidey's hand to avoid issues with a web sling which never look great in pieces.
Challenges
Due to the weight / delicacy of a lot of these figs, I can't get away with the abuse their cheaper 6" plastic counterparts get. That meant a lot of these shots had the body grip visible from the figure's stand which I had to Photoshop out later.
The other huge challenge was poseability of the figures. You simply can't bend a lot of Hot Toys figures to any pose you like - tight suits on Spidey / Captain Marvel for instance are unforgiving to extreme articulation. Still, I pushed all these figures slightly more than I was comfortable with. In some cases (Black Widow, Dr Strange) I shot multiple poses of their body parts to assemble into poses matching the pre-viz later on.
Post shoot, I'm straight into Lightroom for batch processing and export to PSD files. Each photo is then masked before any work starts.
Photoshop
With all the shots done, I start by importing the pre-viz render and all the masked character shots into a master Photoshop file.
Arranging with the pre-viz
Working in black and white, I matched the luminosity levels of the pre-viz character references exactly and place them roughly over their 3D modelled counterparts. Where poses didn't match, I used either puppet warp or liquify to push shots almost exactly where the pre-viz references were.
Whilst I do primarily work in grayscale, I color grade early to get a good idea of what the final treatment will look like, which you can see in play above in this early work.
Captain Marvel FX
Work on Captain Marvel alone was as much time as I've spent on whole composites in the past.
I stubbed in a basic effect for her energy blasts in the first iteration - mainly so see how her bright presence would read with the rest of the composite -
Later on with more of the composite developed I re-approached the energy trails effect. Here I returned to Blender, using a tutorial by SirFloof to render various iterations of the thruster effect as a basis for her. This time I've overlayed the same effect a couple of times, including blurring for a colored glow and done a little work on her hair.
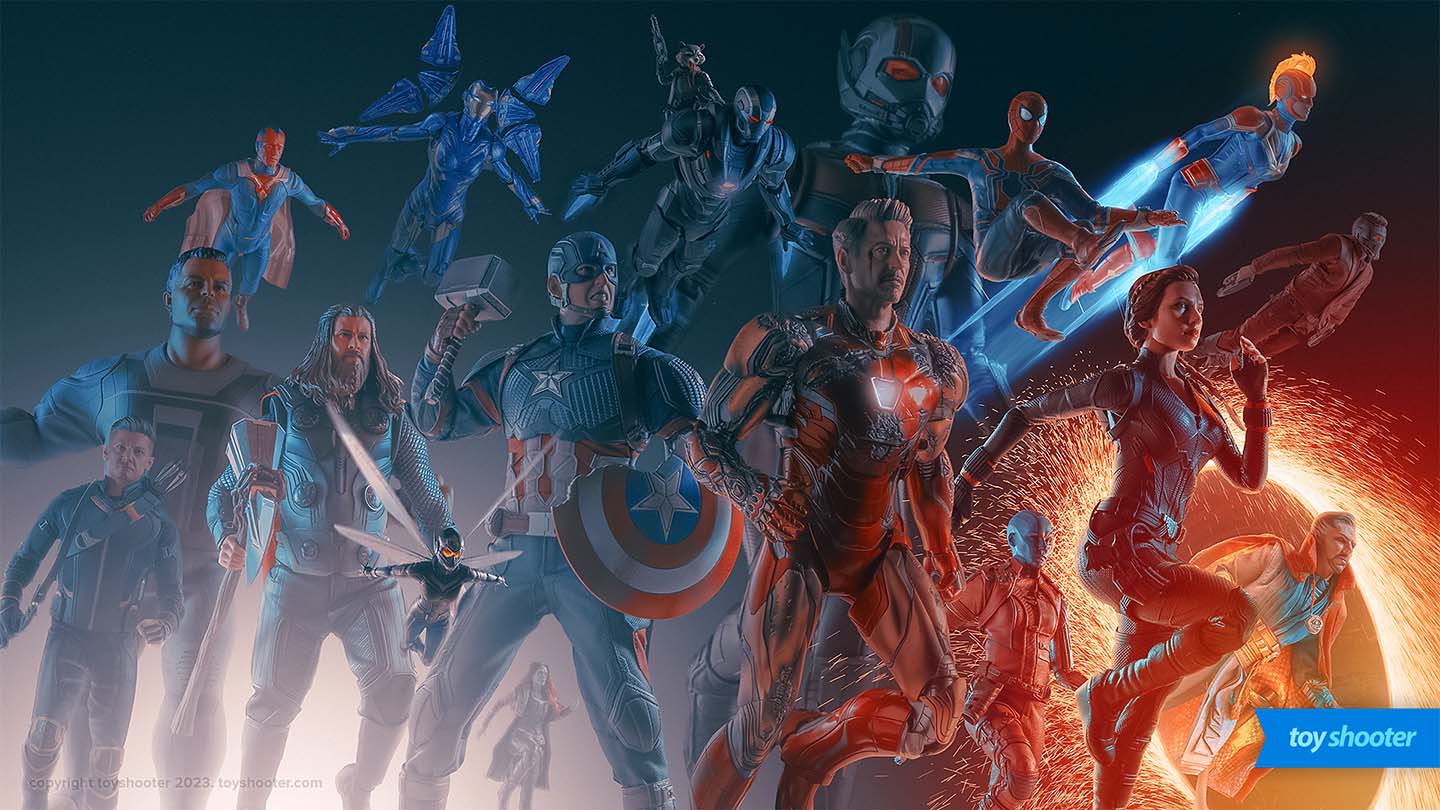
Finally I started from stratch again. Using the same thruster effects but with better render, I build this up more carefully, playing with gradient maps to control color. I also imported reference pictures of Captain Marvel from the film to approximate the effect. In addition to the energy blasts, I added what I'm calling the "Captain Marvel sparkles effect" which is the glowing flame like sheen floating around her. To reproduce this -
- Take a copy of her layer
- Run glowing edges effect on it
- Desaturate & blur slightly
- Create a new document and render the clouds effect followed by difference clouds and save
- Return to the desaturated glowing edge layer and run the displace effect using the difference clouds image
- Undo and repeat with various variations until you're happy
- Run a gradient map on the final result and tweak colors to suit
That took me a while to figure out :)
Suffice to say, I'm very happy with the result - I'll definately return to Captain Marvel on a stand alone piece to play with this later on.
Other FX work
Another call out would be Wasp. For her wings, I cut them off to a separate layer and ran the radial blur (spin) on them to produce the motion effect.
The thrusters on Rescue / War Machine are also using the Blender thruster effect rendered at a different angle, though you can barely see it in the final result.
Notes on Composition
Obviously much of the compositional framework came from Blender. The character arrangement specifically, but also the luminosity.
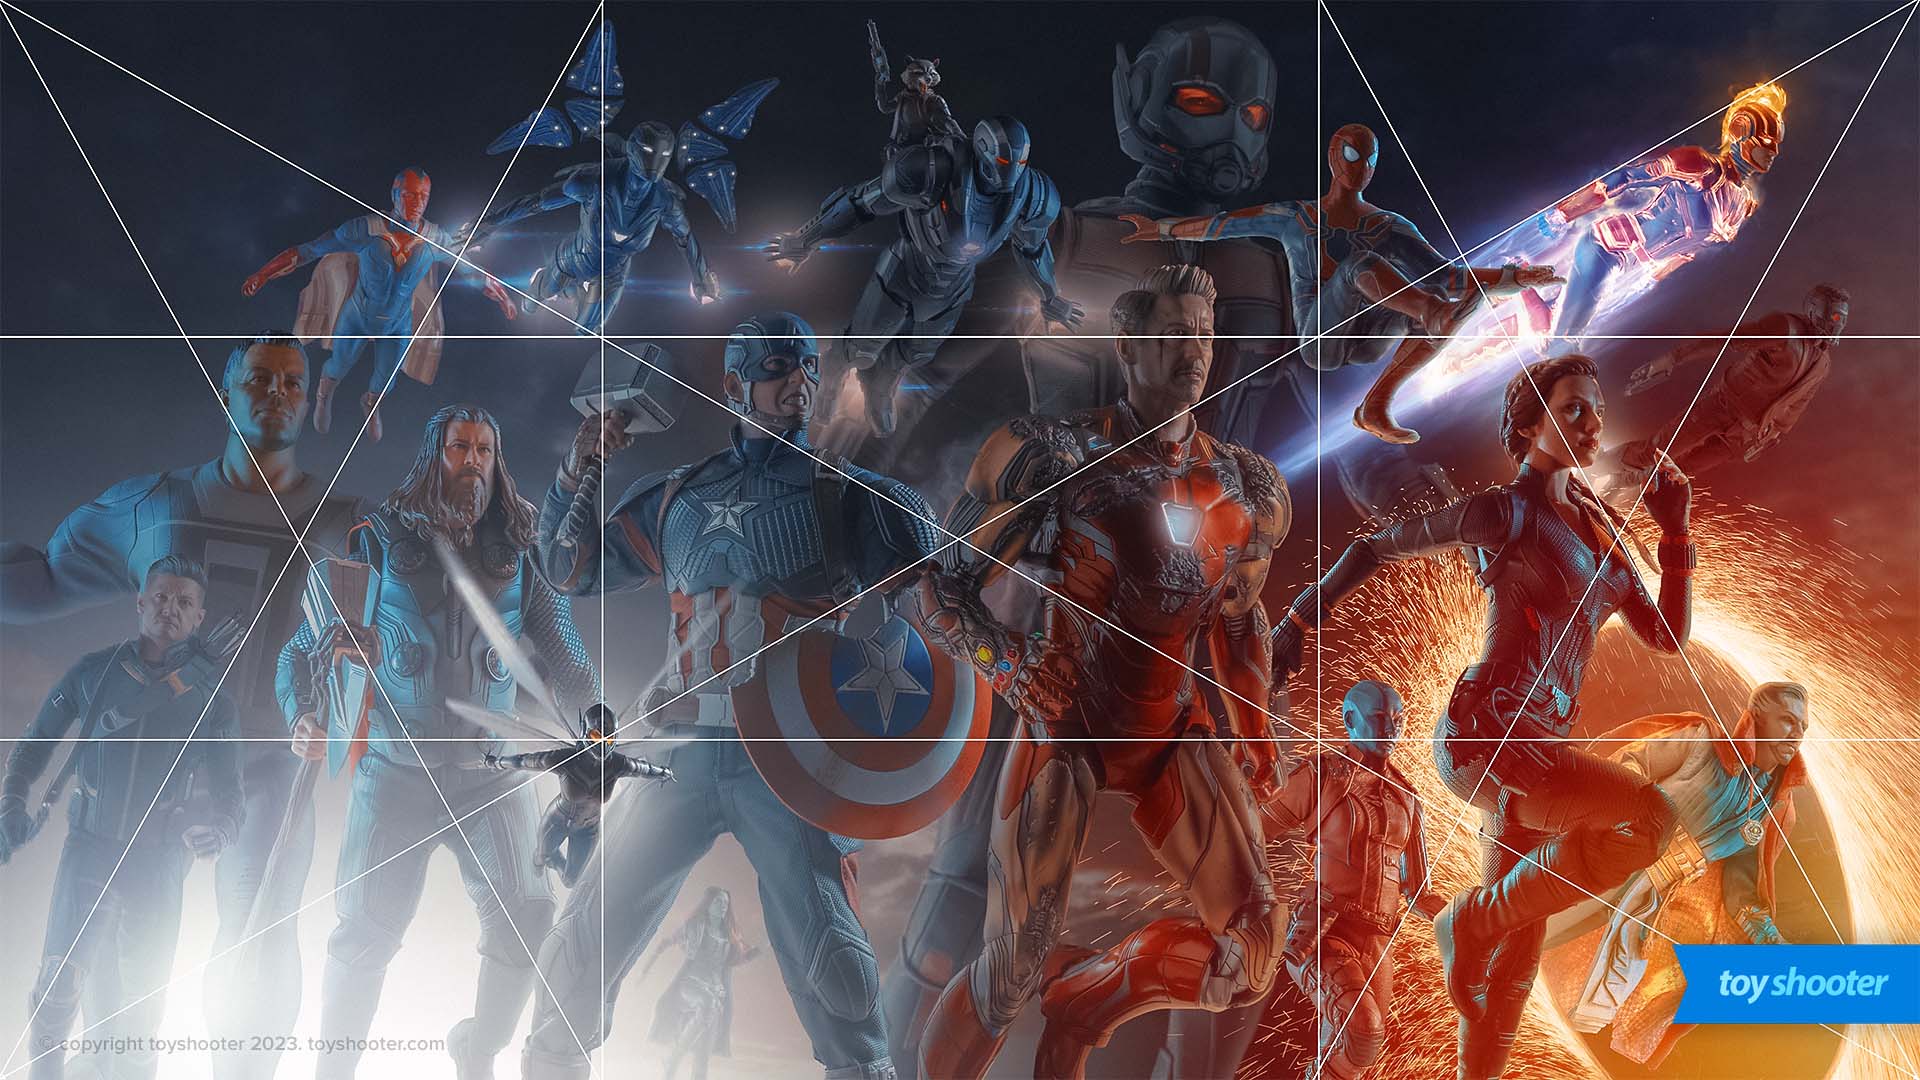
Compare the left and right sides of the image - note the left is "hazy" with very little rendering in the extreme hilights or shadows. As you move to the right, the luminosity range opens up and provides much greater contrast (figure to ground) around effects like the Portal and Captain Marvel. This pulls your eyes across the image and gives weight to the direction of motion inferred by the characters. Saturation also increases left to right.
This was complex to pull off - technically this shouldn't work at all, since an image with two extremes of luminosity and saturation sounds like a bad idea. Again, trusting what came from Blender was key to this.
There are hundreds of micro adjustments on this piece - controlling luminosity and saturation in places to integrate the whole. I frequently exported the work and viewed it on iphone/ipad to check how it "reads". Like any work, sleeping on it and viewing with a fresh set of eyes the next day is key. There are still spots I could improve / correct, but it's also important to know when to stop.
Observations
Whilst this was the longest amount of time I've spent on a single composite, some surprising things I noticed towards the end -
There is very little pure white. This has been a huge problem on my previous pieces - it usually manifests in the photography since it's very hard not to end up with "hot spots" in the photography that then tend to drag a lot of other hilight work towards the same level (even with hillights reduced from RAW photos). The problem with pure white is once you hit it, there's no where to go - you've clipped your light levels. Success with this piece was largely down to trusting the luminosity coming out of blender (shadows as well) as the baseline for the piece. Staying constrained to those limits kept things reigned in, then there are a couple of places (Captain Marvel, Portal) where it's ok to let rip.
Color is also key here - it's easy to let saturation run away then you're backed into a corner. If you're working with a muted palette, you can use saturation to draw attention to areas the same way hilights can.
There are almost no blending layers. Typically I add smoke, haze, dirt and other distractions between layers to help things blend. With this I did very little - I would say the success of the blending is due to heavy application of my "auto rim light" Photoshop action - I used this extensively, sometime multiple times on single characters.
There is no "dodge and burn" or global luminosity changes. Also a first for me, and again it's due to all the luminosity values being set at the start by Blender - finishing adjustments were unnecessary.