When I think of busts, I imagine Caesar carved in marble in a Roman palace, or a small Beethoven carving sat on my old piano teacher's bookshelf. I certainly don't think of Star Wars, which I used to stubbornly believe should be solely represented in full bodied, pose-able plastic form...
So when I first came across Gentle Giant's range of Star Wars Busts a few years back I was initially dismissive of them.
They seemed like some weird knock-off art project aimed at fans who "would buy anything" with Star Wars written on it, like a market trader selling fake t-shirts to fans outside a concert.
The error in my judgment however, was I hadn't seen one of these things up close ...

From an sculptor's perspective, busts offer something you'll never get on poseable figures of the likes of the Hasbro, Sideshow and Hot Toys lines.
You can capture a specific pose and facial expression like a photo.
The level of expression these artists can create in these pieces are incredible, including the ability to perfectly render a freeze frame of body movement, muscles and clothing as if life like.

I can't remember the first Gentle Giant Bust I purchased, but once I had it in my hands I was hooked.
These things are incredible, and the more I collected the more I appreciated the work that had gone into them.
It's fair to say that like any line of collectables, not all the pieces are fantastic. Some of the earlier busts don't have the finesse of more recent releases, others have problems with facial designs and hair; but for the most part, they're exceptional.
Droids, Creatures and Sith lords lend themselves very well to this medium, and the materials and finishes used on some of these models are beautiful.
Approaching The Shoot
From a photographer's perspective, these busts are a dream - they almost shoot themselves, since the artists at Gentle Giant have already done all the hard work of creating the expression and design of the piece. The only variables I need to control are angles, lighting and what I do with the camera.
Since these things are "cut off at the waste," they don't lend themselves to any "realism" style shots with colorful backgrounds from the movies or posed interactions with other characters.
My approach was to shoot these for what they are - art pieces.
Isolating these pieces on black makes the piece do all the work, and that means (like any subject) they need to be very well lit.
Lighting Design
I used a very simple setup for this shoot. A cheap light tent off eBay with a simple black cloth is the basis for the "set"
I used two full-sized studio soft box lights (also a cheap eBay purchase) either side of the light tent to fire two big sources of continuous light through either side of the tent's diffusion screens.
Most soft boxes come with diffusion screens so the light tent is almost redundant, but I had it so used it anyway - extra diffusion never hurts.

You can see the soft boxes are bigger than the light tent and so the front and top edges extend over the diffusion screens, effectively spilling a little more hard light over the edges.
The effect becomes a very soft illumination of the subject from both sides, the huge size of the light sources (relative to the busts) creating a beautiful fall off across the body of the subject.
The light sources are so big they illuminate the whole bust, wrapping around and providing illumination across the face, and at the same time providing a rim-light effect to separate the busts from the black background.

I'm a big fan of continuous light for shoots - I like to see and modify light without having to trigger strobes. For this shoot the big size of the lights meant I could shoot with a fairly small aperture (f11 mostly) without losing detail, and reduce the light spilling onto the black back drop.
So with this setup running, the work was literally point and shoot. Expose for the bust's face, take a few shots, maybe rotate a bust or two and re-compose, switch out for the next one.
Modifying Light
On the first day I started editing the shots and was really pleased with the results, so I decided to step things up the following day ...
Ikea is a photographer's best friend. So many useful items at really cheap prices. For this shoot, I'd found some great telescopic lamps with decent clamps that are absolutely perfect for toy photography.
With these back on the set, I set about looking for color modifiers.
I'd ordered a batch of colored cellophane gels but they were late and I wasn't in the mood to wait, so I hunted around the house for anything colored and transparent.
A red water battle, blue lego window and orange lens cap gave me enough to work with, combined with the advanced technical application of sellotape to affix the modifiers to the telescopic lights.
With my same two-light soft box setup, these colored telescopic lights now allowed me to spill pools of color over the busts. They don't take away or over-power the key lighting, they simply introduce shades of color where I direct the arms of the lights.
In nearly all cases I'm using these as rim lights from behind or just above the busts.

One tricky shot was the Emporer Palpatine bust. I'd setup red and orange rim lights above him, but the depth of his hood meant his face had no illumination on it - remember these were only lit from either side (no "traditional" key light) so his face was in darkness.
As he's a sinister dude, I decided to introduce some blue lighting to bring up his face. This was done with the flash light from an iPhone run through a piece of blue lego firing straight up into his face. The effect on his face is perfect, only down side is this spills a pool of blue light on his chest that is at odds with his red light saber. A fix for this sort of problem would have been to use a small grid on the blue light to prevent spill outside of his face.

A similar issue (motivated light) exists with the Darth Malak bust, the red light is coming from the opposite side to his red saber which detracts somewhat, but I'm so happy with the colors in this shot I'm calling it a happy accident.

Other shots like the Darth Nihilus bust illustrate motivated light setup at it's best - here the red spill would be cast from his saber in "real life" creating a more believeable shot.

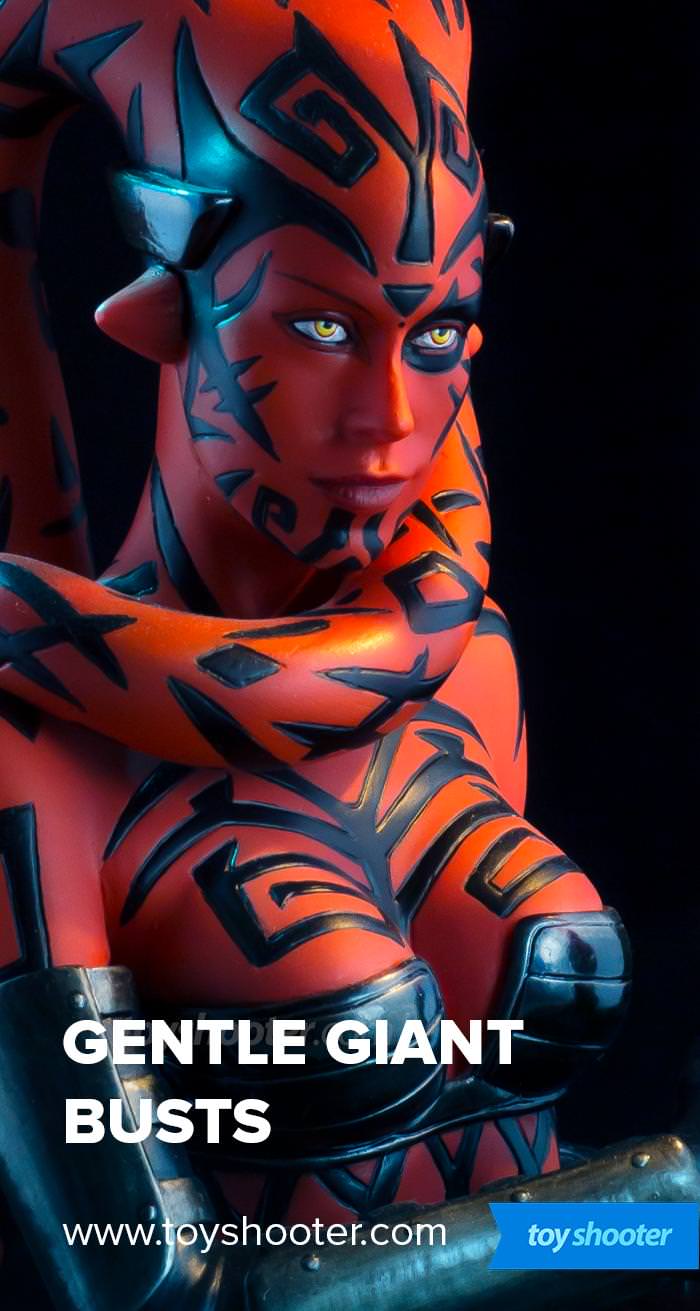
The Darth Talon shot is another personal favorite. This is a very "one dimensional" bust color wise (though obviously very, very three dimensional) - when you look at it close up it's one shade of red throughout. As a result it lacks depth compared to the Aayla Secura bust for example, which has a more graduated paint scheme even though she's a similar single body color.
My lighting setup takes full advantage of her one dimensional color scheme. Because she's one shade of red all over, the light fall off is perfect - you get a complete sense of the dimensions of this character through the light.
Like the Nihilus bust, the lighting produces a more realistic, motivated result based on the position of her saber.

Post
I always shoot RAW photos, and import to Lightroom where I tweak shadow, hilights, vibrance and exposure. I like to crank up the noise reduction and sharpness in Lightroom which get great results, then I export to DNG before opening each shot in Photoshop.
In photoshop, I do a whole bunch of work, mainly to re-color the shot and dodge/burn hilights and shadow.
The hardest work by far, is dealing with the shadows behind the busts.
Knocking out the telescopic lights and other close up light modifiers is just where the challenge begins. In addition, I want to remove unsightly lines / shades in my less-than-perfect light box setup without losing the texture of the shot. In retrospect, I should have spent a little more time preparing the light box to minimize wrinkles / bumps in the fabric used for the backdrop.
Many folks will simply grab the black paint brush in photoshop and daub all the negative space with pure black - the problem with this is you end up with a very amateur result - your subject looks like it's simply been cut out and dumped on a black background.
The thing to be aware of is that every camera will introduce noise and grain to every photo it produces. Dark areas are usually worse, especially with cheaper cameras, but the "grain" or texture of your camera is present across the whole image, so taking the heavy handed approach of painting "pure" black in dark areas destroys this characteristic of your photos. You may not see this on screen in the blacks, but it's there. If you ever print your work, it will stick out big time.
I want to treat the black background with (almost) as much care as the subject, so in each case I add a temporary levels adjustment layer and crank up the mid range on the shot so I can see the many imperfections and details hidden in the black. I use a combination of Clone stamp, healing brush and content aware fill to remove issues in the background without destroying the texture and tone of the image.

Summary
This was a great project, and one of the easiest to complete. no set building or props, no awkward posing issues or other variables.
It's a true compliment to Gentle Giant to say again, these pieces pretty much shoot themselves.
Become a Toy Shooter!
You can learn much more about photographing toys and collectables by joining our site below ...